Disabling New Mail Desktop Alert
As said, the first step of the process is to disable the generic option to always display the New Mail Desktop Alert.
- Outlook 2003 and Outlook 2007
Tools-> Options…-> button: E-mail Options…-> button: Advanced E-mail Options…-> option: Display a New Mail Desktop Alert - Outlook 2010, Outlook 2013 and Outlook 2016
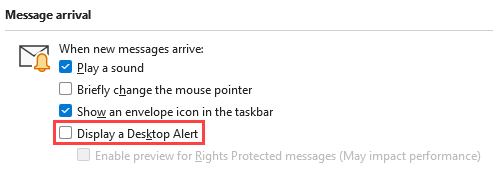
File-> Options-> Mail-> section: Message arrival-> option: Display a Desktop Alert

Disabling the Desktop Alert feature in Outlook 2013.
Creating a New Mail Desktop Alert rule for specific accounts
The next step is to create a rule to display the New Mail Desktop Alert again but only for the accounts that you select.
The approach is slightly different for when you want to disable alerts for only 1 account or multiple.
Option 1: Disable alert for 1 specific account
When you have multiple accounts configured and only want to disable the alerts for 1 specific account, then you need to create the following rule:
- Open the Rules and Alerts dialog;
- Outlook 2003 and Outlook 2007
Tools-> Rules and Alerts… (press OK if you get an HTTP warning) - Outlook 2010, Outlook 2013 and Outlook 2016
File-> button: Manage Rules & Alerts
- Outlook 2003 and Outlook 2007
- When you see the “Apply changes to this folder” drop down list at the top, make sure that the account which you want to exclude is selected here.

- Button New Rule…
- Select “Start from a blank rule” and verify that “Check messages when they arrive” or “Apply rule on message I receive” is selected.
- Press Next to go to the Conditions screen.
- Verify that no condition is selected and press Next.
- A warning will pop-up stating that this rule will apply to all messages. Press “Yes” to indicate that that is correct.
- Select the action “display a Desktop Alert”.
- Press Next.
- Select: except through the specified account
- At the bottom, click on “specified” and then select the account for which you do not want to see the alert.
- Press Finish to complete the rule.
The entire rule will now read as follows:
Apply this rule after the message arrives
on this computer only
display a Desktop Alert
except through the <account name> account
When you had the “Apply changes to this folder” drop down list as mentioned in step 2, you’ll need to repeat the above steps for all the other accounts listed but you can then skip step 10 and 11. If you do not do this, you won’t see alerts for these accounts.
Option 2: Disable alert for multiple accounts
When you have multiple accounts configured and want to disable alerts for multiple accounts, then you need to create the following rule:
- Open the Rules and Alerts dialog:
- Outlook 2003 and Outlook 2007
Tools-> Rules and Alerts… (press OK if you get an HTTP warning) - Outlook 2010, Outlook 2013 and Outlook 2016
File-> button: Manage Rules & Alerts
- Outlook 2003 and Outlook 2007
- When you see the “Apply changes to this folder” drop down list at the top, make sure that the account for which you want to see alerts is selected here.

- Button New Rule…
- Select “Start from a blank rule” and verify that “Check messages when they arrive” or “Apply rule on message I receive” is selected.
- Press Next to go to the Conditions screen.
- Select: through the specified account
- At the bottom, click on “specified” and then select the account for which you want to see the alert.
You can only select one account here but if you want to see the alert for multiple accounts, don’t worry, we’ll get to that later. - Press Next.
- Select the action “display a Desktop Alert”.
- Press Finish to complete the rule.
The entire rule will now read as follows:
When you want to display the New Mail Desktop Alert for other accounts as well, repeat the above process for each account and select it at step 2 and 6.
Rules order and “stop processing more rules”
To make sure that the alert is being shown for each and every mail that is being received for your selected accounts, you must place the newly created rules all the way at the top.
If you don’t want New Mail Desktop Alerts to be shown for messages which are being moved to another folder, you’ll need to sort your “move to folder” rules to the top and add the action “stop processing more rules”.

Use the Up and Down buttons to sort your selected rule up or down.
Was this article helpful?
That’s Great!
Thank you for your feedback
Sorry! We couldn't be helpful
Thank you for your feedback
Feedback sent
We appreciate your effort and will try to fix the article